Introduction to the World’s Easiest Yeast Bread
There’s something truly magical about the aroma of freshly baked bread wafting through your home. As a young professional juggling work and life, taking the time to create something as comforting as homemade bread can feel like a luxury. But let me assure you, it’s worth every minute.
Why Homemade Bread is Worth the Effort
When you think of baking, you might picture complicated recipes and hours of kneading dough. But fear not, with the world’s easiest yeast bread, you can make a delicious loaf with minimal effort and minimal ingredients. Not only does it taste far better than store-bought options, but there’s a heartfelt satisfaction that comes with it. Imagine pulling a warm loaf from the oven and slicing into it, each piece soft and fluffy.
Homemade bread offers:
- Quality Control: You get to choose your ingredients, setting aside those preservatives and chemicals often found in store-bought varieties.
- Customization: Want to add herbs, spices, or even sprinkle in some nuts? You can tailor the bread to fit your flavor profile perfectly.
- Cost Savings: Baking your own bread can be far less expensive than frequently buying artisan loaves from a bakery, especially when you can make several at once.
And here’s a little inspiring tidbit: according to a study from Harvard Health, activities like baking can significantly reduce stress. So not only do you get bread, but you also get a wonderful way to unwind after a busy day.
Imagine how great it would feel to offer freshly baked bread paired with hearty turkey bacon or chicken ham for breakfast or brunch with friends. The flakiness of the butter as you spread it on warm slices is simply unbeatable!
And the best part? It really is simple! With just a few key ingredients and a little patience, you’ll be on your way to creating your very own world’s easiest yeast bread. Stay tuned as we dive into the details of the recipe, where I’ll guide you step-by-step, ensuring your homemade bread journey is both effortless and enjoyable.
Baking bread shouldn’t be daunting; it should be fun, rewarding, and filled with the warmth of home. Ready to roll up your sleeves? Let’s get started!
Ingredients for the World’s Easiest Yeast Bread
When it comes to baking, simplicity is often the key to a successful dish. For the world’s easiest yeast bread, all you need are a few essential pantry staples that you might already have at home:
Essential pantry staples
-
All-purpose flour: About 3 to 4 cups is ideal. This versatile ingredient forms the backbone of your bread.
-
Instant yeast: Just 1 packet (or about 2 ¼ teaspoons) will give your bread that delightful rise without the wait.
-
Warm water: You’ll need approximately 1 ½ cups. The water should feel warm to the touch—think cozy bath temperature—to activate the yeast properly.
-
Salt: Around 1 teaspoon for flavor—don’t skip this step, as it enhances the overall taste of the bread.
-
Sugar: A tablespoon of sugar fuels the yeast and adds a touch of sweetness.
-
Olive oil: A couple of tablespoons help achieve a soft, tender crumb.
With these ingredients on hand, you’re well on your way to creating a delicious loaf of bread. If you’re curious to explore additional flavor variations, consider tossing in herbs or seeds that reflect your personality! This basic recipe is not only forgiving but also allows for your culinary creativity to shine through. For more insights on ingredients, check out this helpful article from King Arthur Baking.
Preparing the World’s Easiest Yeast Bread
There’s something deeply satisfying about the aroma of freshly baked bread wafting through your home. If you’ve ever thought that making yeast bread was too daunting, think again! With this easy-to-follow guide, you’ll master the art of baking the world’s easiest yeast bread in no time. Let’s dive into the steps and enjoy this delightful journey together!
Activate the yeast
The first step in our adventure is activating the yeast. Most often, you’ll be using instant yeast, which is a dream for beginners since it doesn’t require proofing. However, if you prefer the classic method, feel free to start with active dry yeast. Here’s how to activate it:
- Warm Water: Pour about half a cup of warm water (around 110°F or 43°C) into a bowl. This temperature helps dissolve the yeast.
- Add Sugar: Mix in a teaspoon of sugar. Yeast feeds on sugar, so this will help it activate!
- Sprinkle Yeast: Add two teaspoons of yeast into the warm sugar water and let it sit for about 5-10 minutes until it’s frothy. If you see bubbles forming, congratulations! Your yeast is alive and ready to work its magic.
This step is crucial because yeast is alive; it needs a friendly environment to thrive. You can explore more about yeast and how it works here.
Combine ingredients
Now that your yeast is ready, it’s time to bring together the rest of the ingredients. In a large mixing bowl, combine:
- Flour: About 3 cups of all-purpose flour for structure.
- Salt: A teaspoon to enhance flavor.
- Olive Oil: Two tablespoons, which adds richness and texture.
Next, pour the activated yeast mixture into the bowl and mix everything together until a dough forms. This is a great time to put on your favorite song or podcast—baking is all about enjoying the process!
Knead the dough (optional)
Kneading is traditionally an essential step, but for this easy recipe, you can skip it if you’re pressed for time. If you choose to knead, simply turn the dough onto a floured surface and knead for about 5-7 minutes until it becomes smooth and elastic.
Not keen on kneading? No worries! Just give it a good stir until everything is combined well. Remember, the goal here is to create a nice dough without putting too much pressure on yourself.
Let it rise
Once your dough is ready, place it in a lightly greased bowl, cover it with a clean kitchen towel, and let it rise in a warm place. Allow it to sit for about 1 to 2 hours, or until it has doubled in size.
If you’re impatient like me, you might be tempted to peek, but it’s best to resist! During this time, the yeast works diligently, producing gases that will cause your dough to puff up. Isn’t it fascinating how this simple organism transforms mere ingredients into something magical?
Shape and second rise
After the dough has risen, gently punch it down to release the gases. Now, shape it into a loaf by rolling it up from one end to the other. Place it into a greased loaf pan or onto a baking sheet if you’re feeling adventurous.
Cover it again with the towel and let it rise a second time for about 30-45 minutes. You’ll know it’s ready when it has puffed up again, but don’t worry if it doesn’t double in size this time.
Bake to perfection
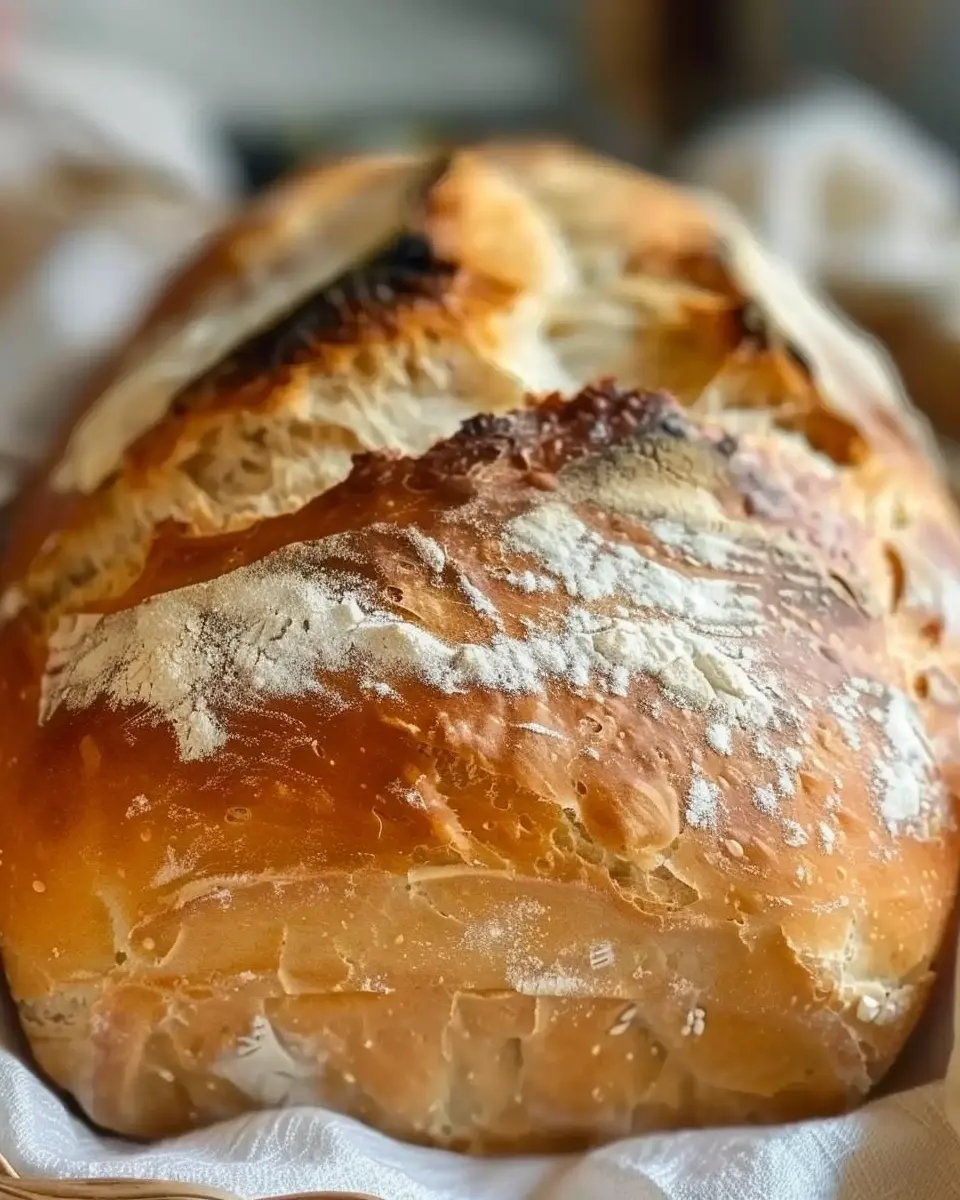
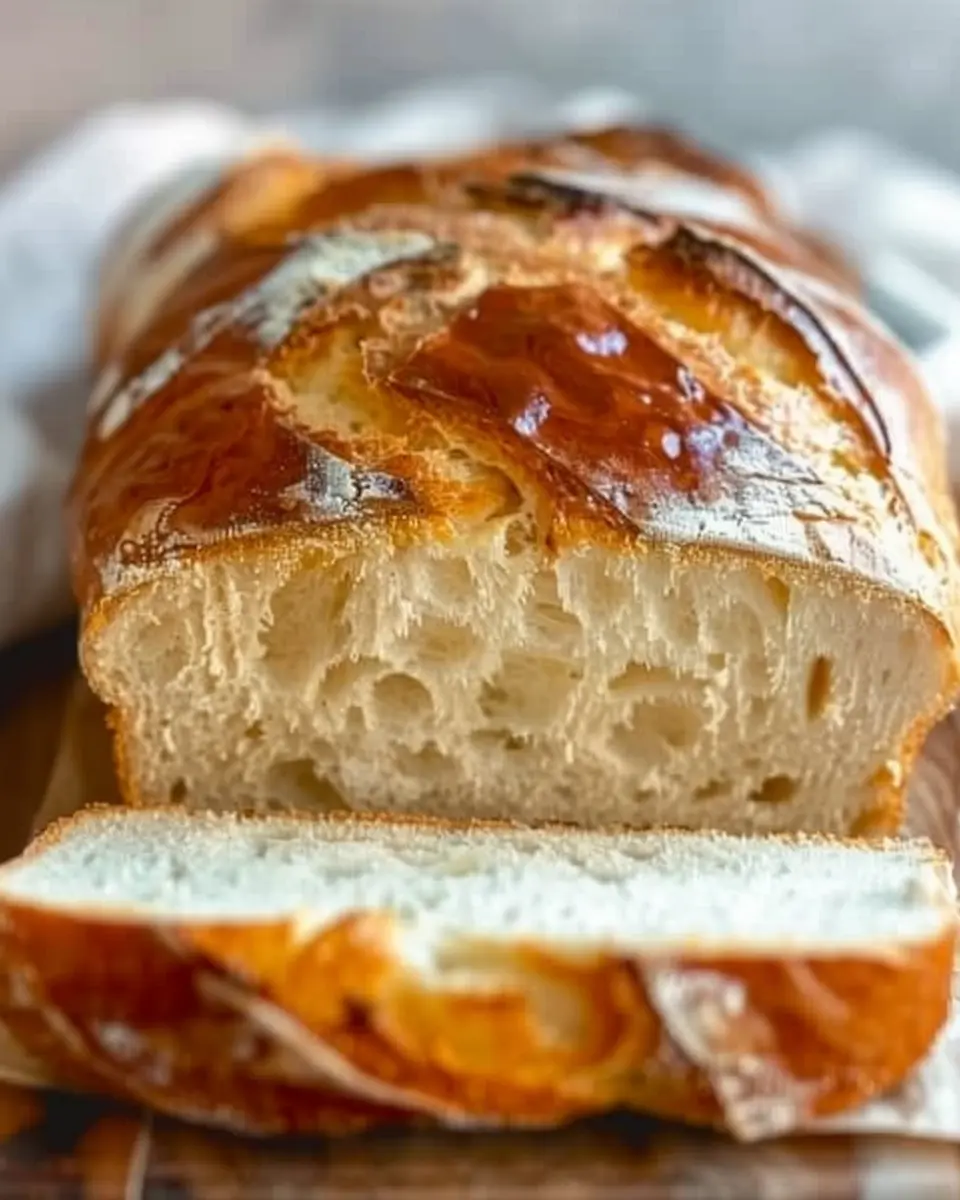
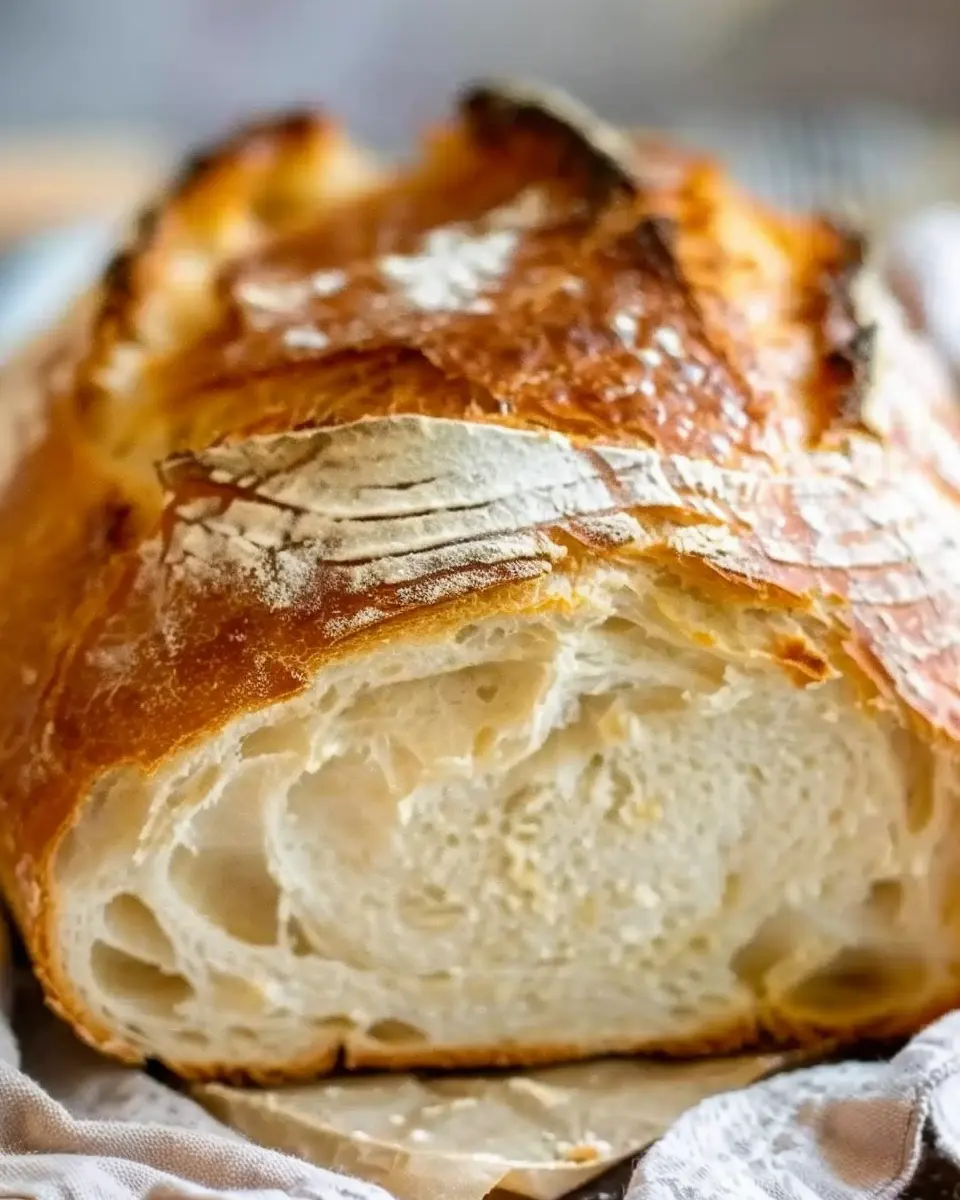
Preheat your oven to 375°F (190°C). Once your dough has completed its second rise, pop it into the oven and bake for about 30-35 minutes or until it’s golden brown and sounds hollow when tapped on the bottom.
The aroma filling your kitchen will make it hard to wait, but be patient and let it cool for a few minutes before slicing. For an extra touch, brush the top with melted butter right after removing it from the oven.
Enjoy your creation with some Turkey Bacon or Chicken Ham, or just savor a slice with butter! You’ll be amazed at how simple it is to make the world’s easiest yeast bread. Happy baking!
Variations of the World’s Easiest Yeast Bread
When you perfect the world’s easiest yeast bread, the possibilities for variations are practically endless. Let’s explore a few delightful ways to customize your loaf that are sure to impress friends and family alike.
Savory Garlic and Cheese Bread
Garlic and cheese add a savory twist to your traditional loaf. Consider mixing in:
- 3-4 cloves of minced garlic
- 1 cup of shredded cheese (cheddar or mozzarella work beautifully)
- A sprinkle of dried herbs (like oregano or basil)
Simply fold these ingredients into your dough as you knead, and bake as usual. The delightful aroma of garlic baking with melty cheese will have everyone rushing to the kitchen!
Sweet Cinnamon Raisin Loaf
If you have a craving for something sweet, a cinnamon raisin twist brings a cozy, delightful flavor. Add:
- 1 cup of raisins
- 2 teaspoons of ground cinnamon
- A tablespoon of sugar for sweetness
Mix these into your dough before the second rise. The result? A warm loaf perfect for breakfast or an afternoon snack, especially enjoyed with a drizzle of honey or a pat of butter.
Whole Grain Version
For a hearty alternative, swap out some of the all-purpose flour for whole wheat flour. Use a 50/50 ratio for the best results. Whole grains offer additional fiber, making it a nutritious choice. Plus, you’ll enjoy a lovely nutty flavor that complements any meal.
Each of these variations allows you to enjoy the versatility of the world’s easiest yeast bread. Experimenting with flavors keeps the baking process exciting, and you never know—your next favorite creation could be just a mix away! For more baking inspiration, check out sites like King Arthur Baking or Food Network.
Cooking tips and notes for the World’s Easiest Yeast Bread
Common pitfalls to avoid
While making the world’s easiest yeast bread, it’s essential to steer clear of a few common mishaps that can dampen your baking experience:
- Incorrect yeast proofing: Make sure your water is warm, not hot. Yeast loves warmth but can be killed by temperatures above 130°F (54°C).
- Over-kneading the dough: Unlike richer breads, this recipe benefits from a gentle mix. Just combine until smooth for that perfect airy texture.
- Neglecting rising time: Give your dough some love! Moist, warm conditions help it rise beautifully, so don’t rush this crucial stage.
Storage tips for your bread
Once you’ve successfully baked your world’s easiest yeast bread, proper storage ensures it stays fresh:
- Room temperature: Keep the bread in an airtight container or wrapped in a kitchen towel for up to three days.
- Freezing: For longer storage, slice the bread and freeze it, placing parchment paper between slices. This prevents sticking and allows you to thaw only what you need.
Want to learn more about bread-making? Check out helpful resources on yeast management from sources like the American Association of Cereal Chemists or the King Arthur Baking Company. Happy baking!
Serving Suggestions for the World’s Easiest Yeast Bread
Perfect Pairings with Meals
When it comes to enjoying the world’s easiest yeast bread, the possibilities are endless. This fluffy loaf is a fantastic companion to a variety of meals. Consider serving it alongside:
- Savory Soups: Think creamy tomato or hearty minestrone; a slice of bread is perfect for dunking.
- Salads: Pair with a vibrant salad topped with grilled chicken or turkey bacon for a light yet satisfying meal.
- Sandwiches: Use slices to stack up some delicious fillings like chicken ham and crispy lettuce for a fresh take on lunch.
For a cozy dinner, serve slices warm with a side of homemade garlic butter. It elevates the bread and makes every bite truly irresistible!
Creative Uses for Leftovers
What if you end up with leftover world’s easiest yeast bread? No worries! Here are a few fun ideas:
- French Toast: Transform stale slices into a delicious breakfast with just eggs, milk, and a sprinkle of cinnamon.
- Bread Pudding: Revive your bread with a rich, custardy dessert—perfect for impressing friends.
- Croutons: Cut them into cubes, toss with olive oil and spices, and bake until golden for a crunchy salad topper.
Don’t let those leftovers go to waste; get creative! For more ideas, check out this guide on using leftover bread that offers even more inspiration. You’ll find that your world’s easiest yeast bread can serve even more delicious purposes!
Time breakdown for the World’s Easiest Yeast Bread
Preparation time
Making this world’s easiest yeast bread requires just about 15 minutes of prep! Gather your simple ingredients—flour, yeast, water, and salt—and mix them together. It’s as straightforward as that. No complex techniques or specialty tools needed here, making it perfect for busy young professionals.
Rising time
Now, let’s talk about the waiting game. You’ll want to let the dough rise for about 1 to 2 hours. This is where the magic happens! The yeast does its job, creating air bubbles that give the bread its delicious fluffiness. Just find a warm spot, like near a sunny window or in a cozy part of your kitchen.
Baking time
Once your dough has risen and doubled in size, it’s time to bake. Preheat your oven to 375°F (190°C) and pop that loaf in for about 30 minutes. The result? A beautifully golden-brown crust that will have everyone eager to dig in.
Looking for more tips? Check out this yeast bread guide for additional insights!
Nutritional facts for the World’s Easiest Yeast Bread
When embarking on your baking journey with the world’s easiest yeast bread, understanding its nutritional aspects can help you enjoy it even more.
Calories per slice
On average, a slice of this delightful bread contains about 80-100 calories, making it a guilt-free addition to your meals. This calorie range may vary slightly based on ingredients, but rest assured, it’s easy to indulge without counting every calorie.
Key nutritional components
This world’s easiest yeast bread packs more than just calories. Here’s a quick breakdown of its nutritional benefits:
- Carbohydrates: Approximately 15-20g per slice, providing a quick source of energy.
- Protein: Roughly 3-4g, essential for muscle repair and overall health.
- Fat: Low in fat with around 1g, making it a great choice for a balanced diet.
- Fiber: If you incorporate whole grain flour, you’ll boost the fiber content, promoting digestive health.
As we explore the wonders of homemade baking, don’t forget to check out Harvard Health Publishing for more insights on the benefits of whole grains. Who knew something so simple could be such a nutritional powerhouse?
So, go ahead and whip up a batch of this fantastic yeast bread—it’s not only easy but nutritious too!
FAQs about the World’s Easiest Yeast Bread
Can I make this bread gluten-free?
Absolutely! You can use a gluten-free flour blend designed for baking, which often includes a mix of rice flour, potato starch, and tapioca flour. Just keep in mind that the texture will diverge a bit from traditional bread. For best results, look for a blend that contains xanthan gum, as it mimics the elasticity of gluten.
How do I know if my yeast is active?
Testing your yeast is a crucial step in making the world’s easiest yeast bread. Start by mixing about 1 teaspoon of sugar into 1/4 cup of warm water (between 100°F and 110°F). Add 1 packet (or 2 1/4 teaspoons) of yeast and let it sit for about 5-10 minutes. If it becomes frothy and bubbly, congratulations! Your yeast is active and ready to work its magic.
Can I mix in different flavors or ingredients?
Definitely! Customization is key when it comes to baking. Consider tossing in herbs like rosemary or thyme for a savory twist. You can also experiment with add-ins like chopped nuts, dried fruit, or even sun-dried tomatoes for extra flavor. Just remember to adjust your liquid ingredients slightly if you’re adding moist ingredients. Check out Serious Eats for creative ideas to personalize your bread experience.
Whether you’re a seasoned baker or just diving into the world of yeast, these tips will help you make the most of your bread-making adventure. Happy baking!
Conclusion on the World’s Easiest Yeast Bread
Making your own bread can be a delightful experience that transforms your kitchen into a haven of warmth and aroma. The world’s easiest yeast bread is not just simple; it’s also versatile and rewarding. Whether you’re a novice baker or someone looking to try a new recipe, this bread can easily become a staple in your kitchen.
Why not explore the joy of homemade bread today? You’ll not only enjoy the satisfaction of creating something delicious from scratch, but you’ll also save money and control the ingredients you use. So grab your flour, water, and yeast, and experience the art of bread-making for yourself! Need inspiration? Check out tips on baking techniques or ingredient substitutions.
Baking can be fun, and the results are oh-so-rewarding!
Print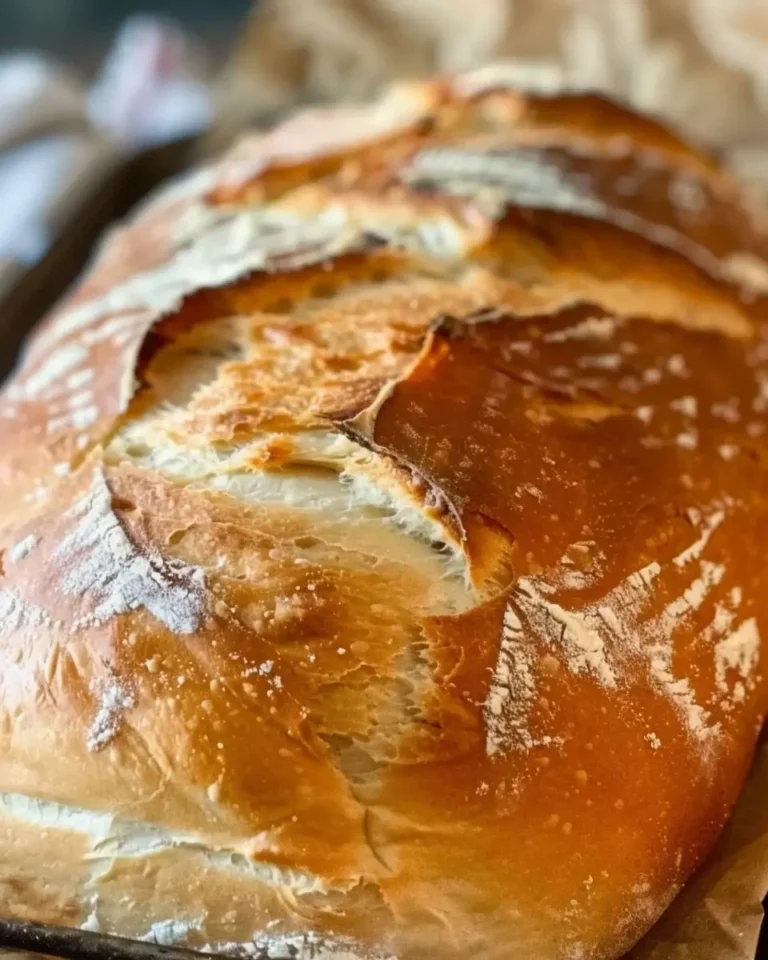
World’s Easiest Yeast Bread: A Friendly Guide to Perfect Loaves
Learn how to make the world’s easiest yeast bread with this friendly guide that ensures perfect loaves every time.
- Total Time: 2 hours 50 minutes
- Yield: 1 loaf 1x
Ingredients
- 3 cups all-purpose flour
- 1 tablespoon sugar
- 1 teaspoon salt
- 1 packet active dry yeast
- 1.5 cups warm water
Instructions
- In a large bowl, combine the flour, sugar, salt, and yeast.
- Add the warm water and mix until a dough forms.
- Cover the bowl and let the dough rise for about 2 hours.
- Preheat your oven to 375°F (190°C).
- Bake the bread for 30-35 minutes or until golden brown.
- Let it cool before slicing and serving.
Notes
- For additional flavor, consider adding herbs or garlic to the dough.
- This bread can be easily customized with various toppings.
- Prep Time: 15 minutes
- Cook Time: 35 minutes
- Category: Bread
- Method: Baking
- Cuisine: American
- Diet: Vegetarian
Nutrition
- Serving Size: 1 slice
- Calories: 120
- Sugar: 1g
- Sodium: 200mg
- Fat: 1g
- Saturated Fat: 0g
- Unsaturated Fat: 0g
- Trans Fat: 0g
- Carbohydrates: 24g
- Fiber: 1g
- Protein: 4g
- Cholesterol: 0mg
Keywords: yeast bread, easy bread, quick bread