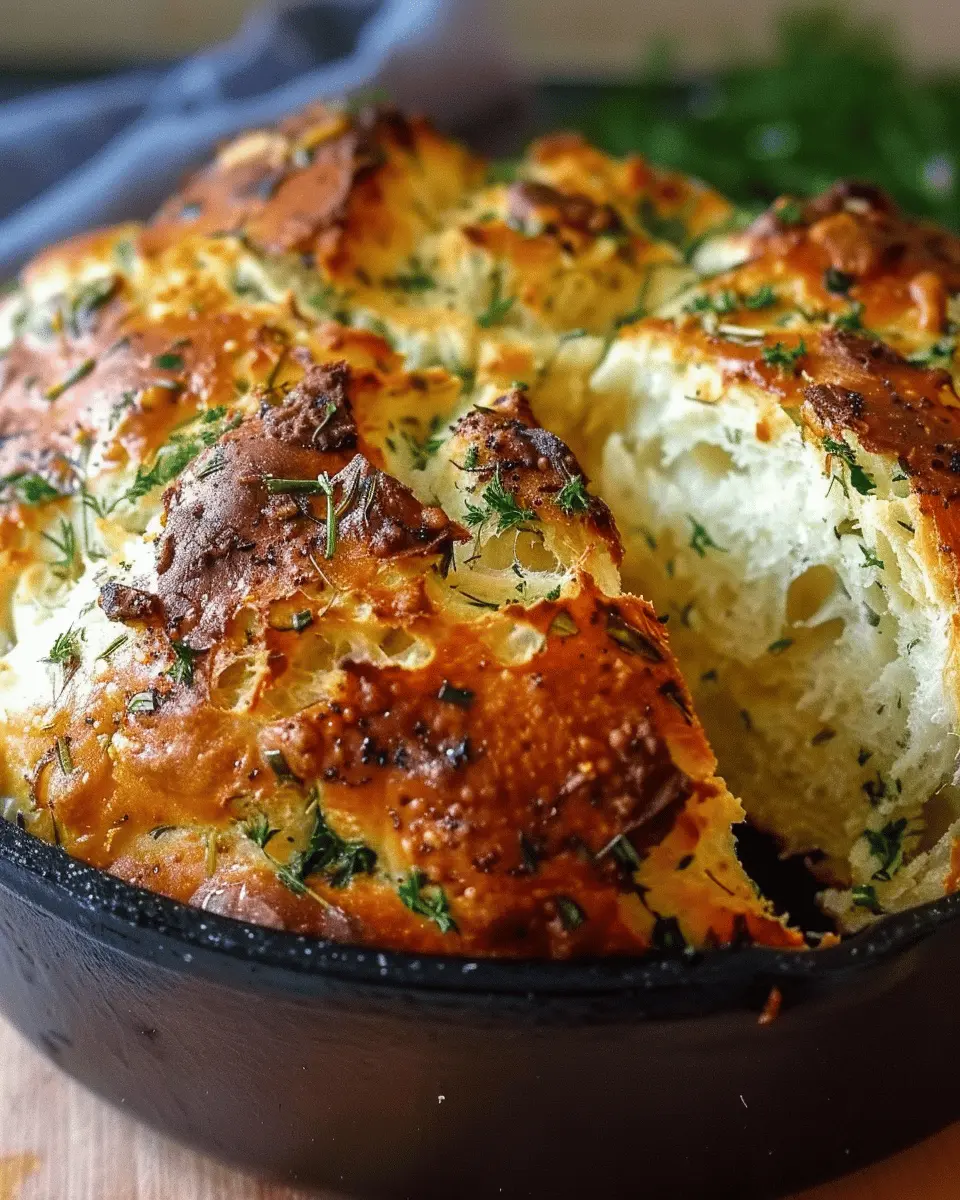
Introduction to Garlic Herb Dutch Oven Bread
There’s something truly magical about homemade bread. The aroma wafting from your kitchen, the satisfaction of kneading dough by hand, and that unbelievable moment when you slice into a fresh loaf—it’s an experience that’s hard to beat. When we talk about garlic herb Dutch oven bread, we’re diving into a realm where simplicity meets sophistication, making it a fantastic choice for both novice bakers and seasoned pros.
What’s so special about homemade bread?
Making bread at home isn’t just about the final product; it’s about the journey. For many, it’s a way to unwind after a long day, connecting with basic cooking techniques that have been around for centuries. Did you know that baking your own bread can also be a healthier option? You have complete control over the ingredients, allowing you to customize flavors and avoid preservatives typically found in store-bought loaves. Plus, research suggests that engaging in cooking can enhance mental well-being, providing a creative outlet while you whisk, knead, and bake.
And here’s the kicker—Dutch oven bread is one of the easiest types to master. You don’t need fancy equipment; just your hands, a mixing bowl, and one sturdy Dutch oven. This method creates a steam-filled environment that mimics a professional bread oven, resulting in a crust that’s perfectly crispy, while the inside remains delightfully soft. With the addition of garlic and herbs, you elevate basic bread into a fragrant centerpiece that will impress friends and family alike.
Elevate your bread game
Imagine biting into a warm slice of garlic herb Dutch oven bread, the garlic flavor dancing on your palate, mingled with fragrant herbs like rosemary and thyme. Perfect for dipping in olive oil, pairing with soups, or serving alongside your favorite proteins like turkey bacon or chicken ham, this bread transforms any meal into something special.
So why not gather your ingredients, embrace the art of baking, and let your kitchen become a hub of aromatic delights? If you’re ready to embark on this bread-making adventure, grab your Dutch oven and let’s get started! To dive deeper into the baking process, check out the bread-making basics for tips that can elevate your skills even further.
Ingredients for Garlic Herb Dutch Oven Bread
Baking garlic herb Dutch oven bread is not only satisfying but also a fantastic way to fill your home with mouthwatering aromas. Here’s what you’ll need to get started on this delightful loaf.
Essential ingredients you’ll need
To create this flavorful bread, gather the following staples:
- All-purpose flour: The foundation of any great bread.
- Warm water: Activates the yeast for that perfect rise.
- Active dry yeast: Gives your loaf its airy texture.
- Salt: Essential for flavor and structure.
- Olive oil: Adds moisture and richness.
- Minced garlic: The star ingredient that brings the herb flavor alive.
- Fresh herbs: Think rosemary, thyme, or parsley for that aromatic punch.
Optional additions for extra flavor
Once you’ve nailed the basic recipe, consider jazzing it up with these extras:
- Cheese: A sprinkle of parmesan or mozzarella can elevate your bread to gourmet levels.
- Turkey bacon or chicken ham: Incorporating bits of these can offer a delightful twist.
- Sun-dried tomatoes or olives: For a Mediterranean flair.
Experiment with these additions to find your perfect blend! If you’re looking for more cooking inspiration, check out this site for expert tips and recipes.
With these ingredients in hand, you’re ready to embark on your homemade garlic herb Dutch oven bread adventure!
Step-by-step Preparation of Garlic Herb Dutch Oven Bread
Making Garlic Herb Dutch Oven Bread is not just a culinary endeavor; it’s an experience that fills your home with irresistible aromas and creates a sense of warmth, comfort, and accomplishment. Whether you’re baking for a dinner party or enjoying a cozy night in, this step-by-step guide will ensure you craft the perfect loaf. Let’s dive in!
Gather and mix your ingredients
Before you start mixing, it’s essential to gather all your ingredients. Here’s what you’ll need:
- 3 cups all-purpose flour
- 1 ½ cups warm water
- 1 packet of active dry yeast (about 2 ¼ teaspoons)
- 1 tablespoon sugar
- 1 ½ teaspoons salt
- 3–4 cloves of garlic, minced
- 1 tablespoon dried herbs (like rosemary or thyme)
- A splash of olive oil
Once you have your ingredients ready, the next step is mixing them. In a large mixing bowl, combine the warm water, sugar, and yeast, letting it sit for about 5 minutes until it becomes frothy. This simple fermentation process is essential for creating that delicious airy texture. Then, add the salt, minced garlic, and herbs before slowly incorporating the flour. You can use a wooden spoon or your hands—either way, the key is to mix until just combined.
For a richer flavor, consider using high-quality herbs and fresh garlic. They can make a noticeable difference in the final result. If you’re looking for more tips on baking with yeast, check out King Arthur Baking.
The art of dough resting
After mixing, the magic continues with the resting phase. Cover the bowl with a damp kitchen towel or plastic wrap and let it sit at room temperature for 12-18 hours. This long fermentation process not only develops the flavor but also helps create a stunning crust.
While your dough rests, maybe consider preparing a side dish or planning the rest of your meal. Perhaps a nice salad or some roasted vegetables? The possibilities are endless!
Preheating the Dutch oven
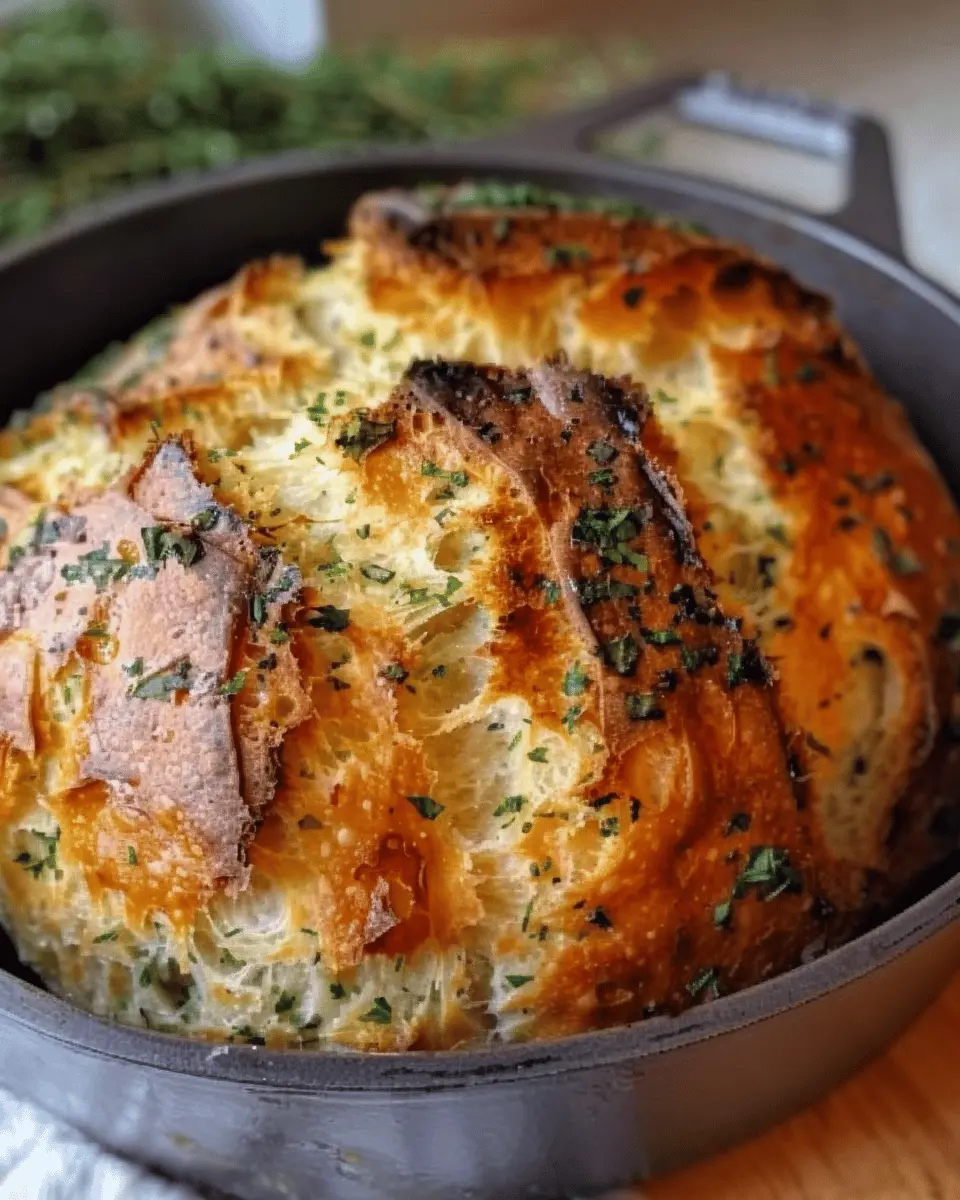
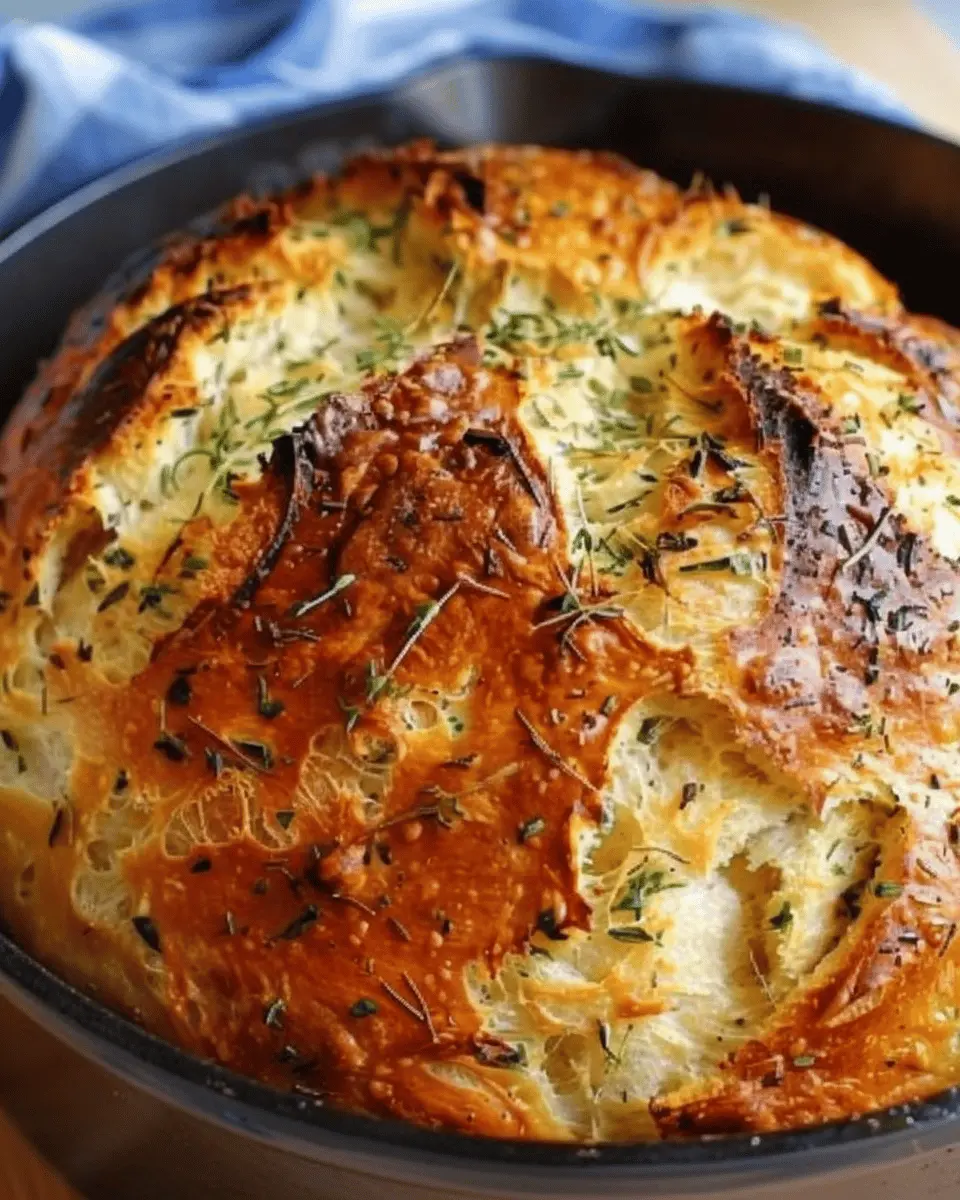
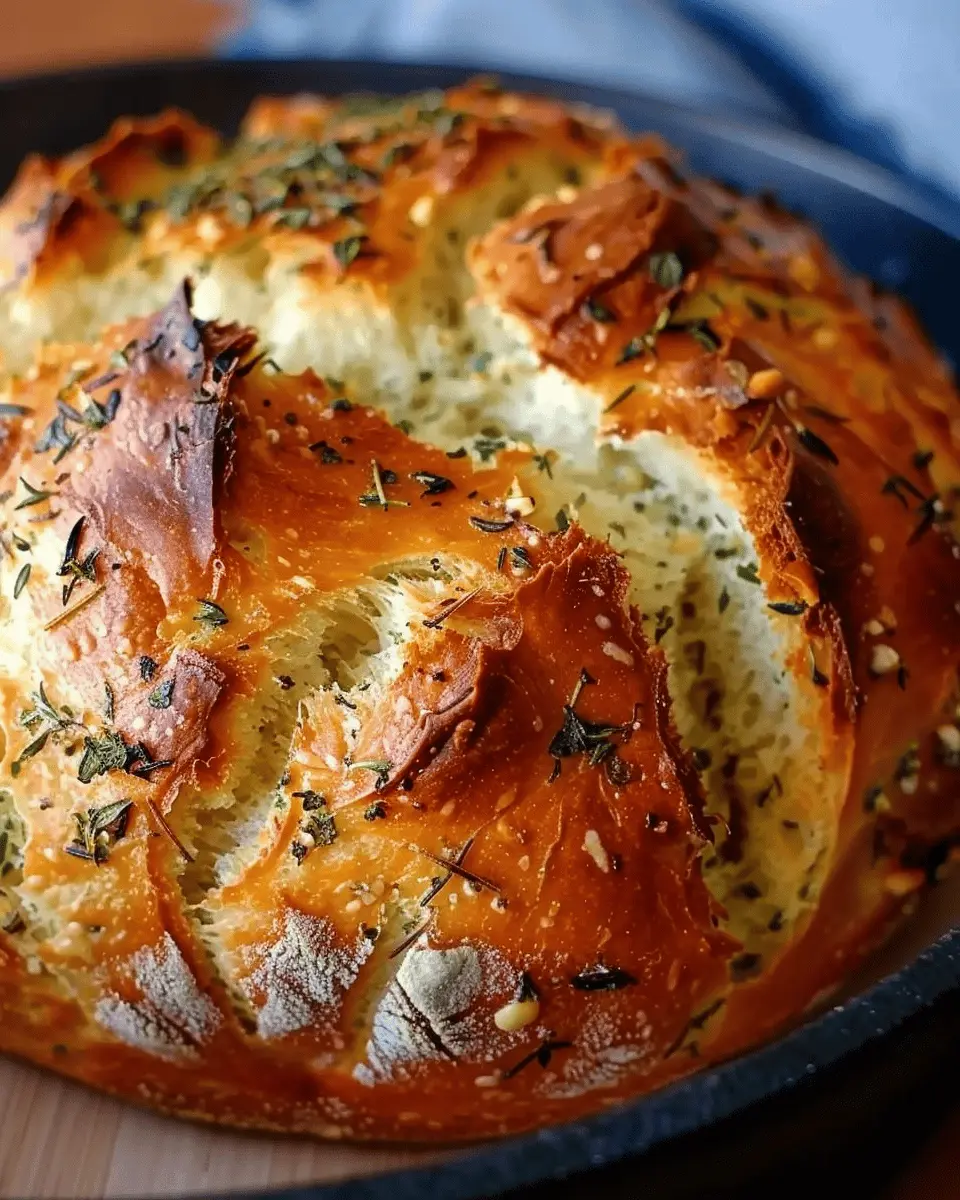
Once your dough has risen beautifully, you’re ready to take things up a notch by preheating your Dutch oven. Place your Dutch oven (with its lid) in the oven and preheat it to 450°F (232°C). The high heat is crucial for achieving that perfect crust on your garlic herb Dutch oven bread.
Pre-heating the pot sets the stage for steam to form when your dough hits the heated surface, a key factor in creating that desirable union of crusty exterior and soft interior.
Shaping your dough and adding it to the pot
Once your dough has finished resting and is pulsating with air bubbles, it’s time to shape. Sprinkle a little flour on your countertop and gently turn out your dough. Using your hands, fold it over on itself a few times until it forms a rough ball.
Then, let it rest for about 30 minutes, covered with a towel. This rest will make it easier to handle. Once it’s ready, carefully take the Dutch oven out (remember, it’s hot!) and then place a sheet of parchment paper inside before adding your dough. This makes for easy lifting later when it’s time to slice into your culinary masterpiece.
Perfecting the baking process
Now comes the most exciting part—baking! Place the lid back on your Dutch oven and slide it into the oven. Bake for 30 minutes with the lid on and then an additional 15-20 minutes with the lid off. This allows the loaf to develop a beautiful golden-brown crust while the inside remains moist and fluffy.
After it’s done, let it cool slightly on a wire rack. The cooling process is crucial because it helps set the inside perfectly. Have patience! The aroma will be tantalizing, but allow it to rest for at least 15 minutes before slicing. This bread is perfect for pairing with your favorite dips or spreads, or simply enjoy it fresh with a touch of butter.
In just a few steps, you’ve made your own Garlic Herb Dutch Oven Bread. It’s great for impressing guests or curling up with a good book. So, what are you waiting for? Get baking and enjoy the fruits of your labor!
Variations on Garlic Herb Dutch Oven Bread
When it comes to garlic herb Dutch oven bread, the possibilities are almost endless! By experimenting with different flavors and ingredients, you can create a loaf that’s truly unique to your taste. Here are a couple of delightful variations that might just inspire your next baking adventure.
Adding Different Herbs for Unique Flavors
While classic garlic and herbs like rosemary and thyme are a fantastic combo, don’t hesitate to shake things up! Consider these alternatives to elevate your bread:
- Basil: Infuses a sweet, aromatic flavor reminiscent of Italian cuisine.
- Oregano: Adds a robust, savory punch, perfect for Mediterranean-inspired dishes.
- Parsley: Offers a fresh, crisp taste that brightens up the bread.
For a twist, try mixing in some dried herbs like Herbes de Provence or Italian seasoning for a fragrant delight. The key is to experiment until you find the blend that speaks to you!
Incorporating Cheese or Nuts for Texture
Adding cheese or nuts not only enhances the flavor but also provides a delightful textural contrast! Here are some ideas to get you started:
- Cheddar: Sharp cheddar mixed into the dough creates delightful pockets of cheesy goodness.
- Feta: This tangy cheese works beautifully with herbs like oregano or basil.
- Pecans or Walnuts: Adding chopped nuts can introduce a satisfying crunch that pairs well with the soft interior.
These additions can transform your garlic herb Dutch oven bread into an impressive side dish or an unforgettable sandwich base. For more on making everyday ingredients special, check out articles on Food52 or visit Serious Eats for expert tips. Happy baking!
Cooking Tips and Notes for Garlic Herb Dutch Oven Bread
Secrets to a crispy crust
To achieve that delightful, crispy crust on your garlic herb dutch oven bread, preheat your oven with the Dutch oven inside. This step creates a mini-steam oven that helps to form a beautiful crust as the dough cooks. Once you place the dough in, cover it for the first part of the baking to trap steam, exposing it only towards the end to allow browning. For an extra kick, consider sprinkling some sea salt on top before baking. You can find more tips on achieving the perfect crust in this article on Bread Baking Techniques.
How to maintain freshness
To keep your garlic herb dutch oven bread fresh longer, wrap it in a clean kitchen towel and store it at room temperature. Avoid plastic bags, as they can make the crust soggy. If you’d like to keep it for an extended time, slice the bread and freeze it in an airtight container. This way, you can enjoy a slice anytime you crave fresh bread. For tips on proper bread storage, check out The Perfect Loaf for expert advice. Remember, nothing beats enjoying freshly baked bread straight from the oven!
Serving Suggestions for Garlic Herb Dutch Oven Bread
Pairing with Soups and Salads
When it comes to Garlic Herb Dutch Oven Bread, its warm, crusty texture makes it a perfect companion to a variety of soups and salads. Imagine dipping a slice into a velvety tomato bisque or enjoying it alongside a vibrant Greek salad. The bread’s robust garlic and herb flavors complement the freshness and acidity of salads beautifully. Consider making a classic chicken noodle soup or a hearty broccoli cheddar to elevate your meal.
For a refreshing twist, try serving it with a lemony quinoa salad. This combination not only satisfies the taste buds but also adds to your fiber intake, making it a wholesome dining experience.
Creative Ways to Use Leftovers
Got any leftover garlic herb dutch oven bread? Don’t let it go to waste! Turn it into delightful croutons by cubing, tossing with olive oil, and baking until golden. These crunchy bits can elevate any salad or soup. Another idea is to make a savory bread pudding with eggs, cheese, and vegetables – perfect for brunch!
Feeling adventurous? Blend leftover bread into breadcrumbs for use in dishes like turkey bacon burgers or baked chicken ham. Trust us, your taste buds will thank you!
By being creative, you not only reduce food waste but also make the most out of your delicious bread. For more inspiration, check out this resource on utilizing bread leftovers.
Time Breakdown for Garlic Herb Dutch Oven Bread
Preparation Time
Creating your garlic herb dutch oven bread starts with about 20-30 minutes of preparation. This includes gathering your ingredients, mixing the dough, and kneading it gently. Taking your time during this phase ensures a great texture!
Resting Time
Patience is key here, as the dough needs to rest for approximately 1-2 hours. This resting period allows the yeast to work its magic, resulting in a delightful rise and fluffiness. You can use this time to prep your favorite toppings or pairings!
Baking Time
Finally, the moment you’ve been waiting for! The garlic herb dutch oven bread will bake for around 30-40 minutes. Keep an eye on it toward the end to ensure a beautiful golden crust. Just imagine the aroma filling your kitchen as it bakes—pure bliss!
For more tips on bread-making, consider checking out King Arthur Baking for expert advice. Happy baking!
Nutritional Facts for Garlic Herb Dutch Oven Bread
Calories and Serving Size
A satisfying slice of garlic herb Dutch oven bread typically clocks in at around 200 calories per serving. With generous portions, this recipe is perfect for sharing and complements various meals. A standard serving size is about one thick slice, making it easy to enjoy while still keeping an eye on your intake.
Key Nutritional Components
This delightful bread is not just delicious but also offers some nutritional benefits. Key components include:
- Carbohydrates: Provides energy for your day-to-day activities.
- Fiber: Vital for digestion and can help keep you feeling fuller longer.
- Protein: Helps to rejuvenate your muscles, especially after a long day.
- Vitamins and minerals: Essential nutrients, particularly if you use whole grain flour.
To better understand the nutritional value of bread and how it fits into a balanced diet, consider checking resources like USDA’s FoodData Central for in-depth analysis.
Whether you’re planning a cozy dinner or an easy lunch, this garlic herb Dutch oven bread will not only tantalize your taste buds but also elevate your meal!
FAQs about Garlic Herb Dutch Oven Bread
Can I use whole wheat flour?
Absolutely! While traditional recipes often call for all-purpose flour, substituting in whole wheat flour is a great way to add extra nutrition and flavor to your garlic herb Dutch oven bread. Keep in mind that whole wheat flour tends to absorb more moisture, so you may need to slightly increase the water in your dough. A good rule of thumb is to start with a 1:1 ratio and adjust as necessary until your dough reaches the right consistency.
What’s the best way to store leftover bread?
Storing your delicious garlic herb Dutch oven bread properly is essential to keeping it fresh. Allow the bread to cool completely, then wrap it in wax paper or parchment. This method prevents moisture from getting trapped, which can lead to mushiness. Store it in a bread box or a cool, dark place to maintain its crusty texture. If you have more bread than you can consume in a few days, consider freezing slices for later use. Simply place them in a freezer-safe bag, and thaw at room temperature or in the toaster when you’re ready to enjoy!
Can this recipe be made without a Dutch oven?
Yes, you can absolutely make garlic herb Dutch oven bread without a Dutch oven! If you don’t have one, simply use a heavy-duty baking sheet or a baking stone. The key is to create steam during baking, which gives that lovely crust. To do this, place a pan of water on the lower rack of the oven or spritz some water inside just before closing the oven door. This trick helps mimic the steam-retaining environment of a Dutch oven, resulting in a delightful crust!
For more baking tips, check out King Arthur Baking.
Conclusion on Garlic Herb Dutch Oven Bread
As we wrap up our exploration of garlic herb dutch oven bread, it’s clear this recipe isn’t just about baking; it’s about creating moments. Imagine the aroma wafting through your kitchen as you pull this golden loaf from the oven—it’s the perfect companion for hearty meals or a cozy gathering.
To make the experience even better, pair your bread with a spread of your favorite herb-infused olive oil or a homemade dip. As a crowd-pleaser, it’s great for beginners and seasoned bakers alike. Let your creativity flow as you experiment with ingredients!
Get inspired by more delicious bread recipes on platforms like King Arthur Baking and elevate your baking game!
Print
Garlic Herb Dutch Oven Bread: The Best Homemade Recipe You’ll Love
This Garlic Herb Dutch Oven Bread is the perfect combination of crispy crust and soft, fluffy interior, infused with aromatic garlic and herbs.
- Total Time: 2 hours
- Yield: 1 loaf 1x
Ingredients
- 3 cups all-purpose flour
- 1.5 teaspoons salt
- 1 teaspoon active dry yeast
- 1.5 cups warm water
- 2 tablespoons olive oil
- 3 cloves garlic, minced
- 2 tablespoons fresh herbs (such as rosemary and thyme)
Instructions
- In a large bowl, combine the flour, salt, and yeast.
- Add the warm water, olive oil, minced garlic, and fresh herbs to the dry ingredients. Mix until a sticky dough forms.
- Cover the bowl with a damp cloth and let it rise for about 1-2 hours until doubled in size.
- Preheat your oven to 450°F (232°C) and place a Dutch oven inside to heat for 30 minutes.
- Carefully remove the hot Dutch oven, and place your dough inside. Cover with the lid and bake for 30 minutes.
- After 30 minutes, remove the lid and bake for an additional 15-20 minutes until the bread is golden brown.
- Remove from the oven and let cool before slicing.
Notes
- For added flavor, try using different herbs according to your preference.
- This bread can be easily frozen for later use.
- Prep Time: 15 minutes
- Cook Time: 45 minutes
- Category: Bread
- Method: Baking
- Cuisine: American
- Diet: Vegetarian
Nutrition
- Serving Size: 1 slice
- Calories: 150
- Sugar: 1g
- Sodium: 300mg
- Fat: 3g
- Saturated Fat: 0.5g
- Unsaturated Fat: 2.5g
- Trans Fat: 0g
- Carbohydrates: 28g
- Fiber: 1g
- Protein: 5g
- Cholesterol: 0mg
Keywords: Garlic, Herb, Dutch Oven, Bread, Homemade