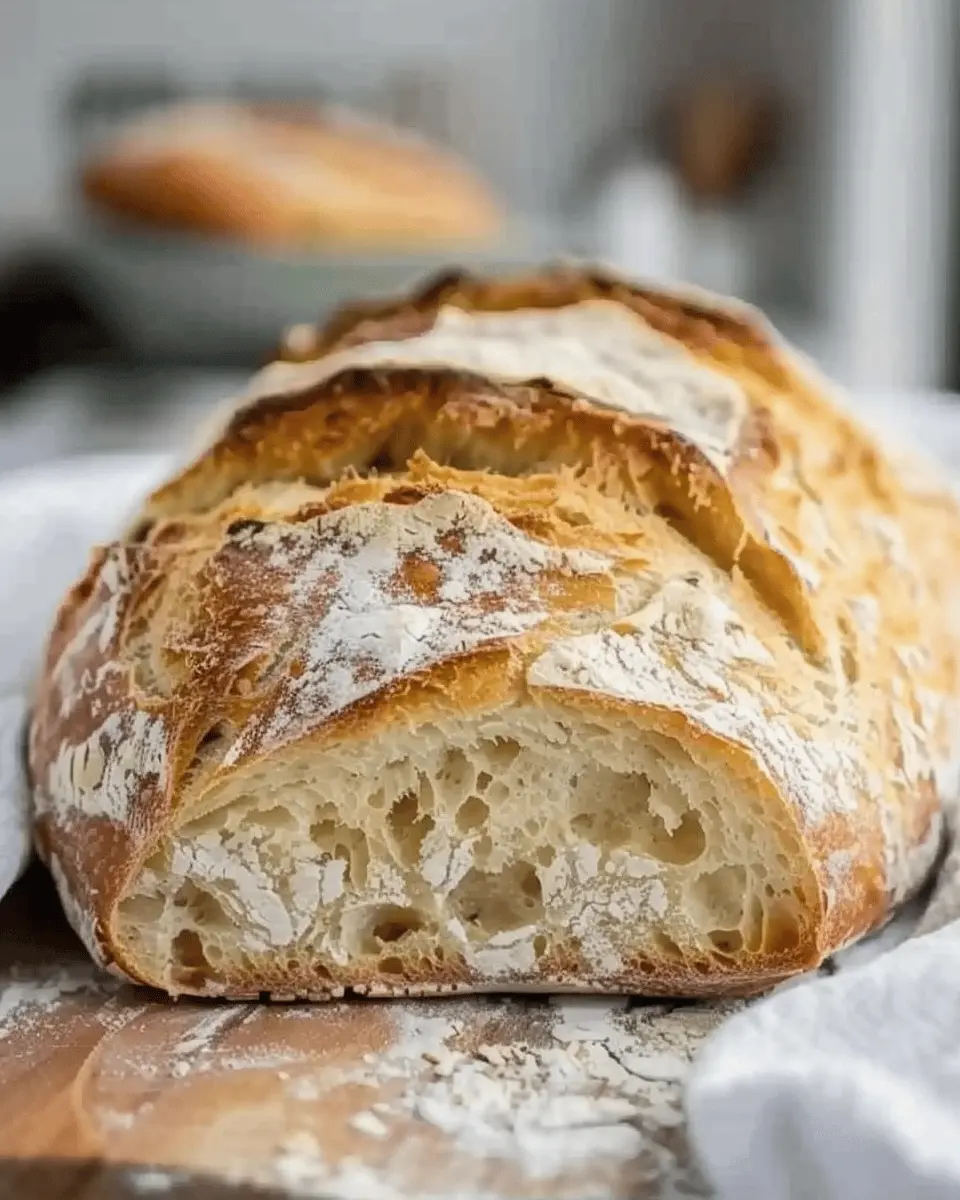
Artisan Bread Recipe: Introduction to Homemade Goodness
Baking your own bread is an experience like no other. Imagine the warm aroma of fresh bread wafting through your home, while your kitchen transforms into a cozy haven. But why should you delve into the world of homemade bread? Let’s explore the benefits!
Why bake your own artisan bread?
Quality Control
When you bake an artisan bread recipe yourself, you’re in charge of the ingredients. This means no preservatives, chemicals, or anything artificial that you can’t pronounce. Just pure, wholesome ingredients, allowing you to create a healthier alternative to store-bought options.
Customization
Perhaps you’re a fan of robust flavors, or maybe you’re trying to reinvent classic recipes. Baking at home gives you the freedom to experiment! Want to add herbs, seeds, or even spices? Go for it! You can create your ideal loaf that caters to your unique taste preferences.
Cost-Effective
Let’s face it—artisan bread from specialty bakeries can be pricey. By baking your own, you not only save money but also invest in a skill that pays off every time you take a bite of that freshly baked goodness. Plus, you can make larger batches and freeze them for later, which is perfect for busy weeknights.
Mindfulness and Relaxation
In our fast-paced lives, taking time to bake can be a therapeutic experience. Kneading dough is a fantastic way to unwind and disconnect from the daily grind. The rhythmic motion is almost meditative and allows you to focus on the present moment, minimizing stress.
Community Connection
Homemade bread has a way of bringing people together. Whether it’s sharing slices with friends during a dinner party or enjoying a quiet moment with family, breaking bread creates warm memories that last a lifetime.
As you embark on this bread-making journey, remember that it’s not just about the final product. Every step—from mixing to baking—is a chance to connect with the process and relish the homemade goodness you’re creating. For more insights on the benefits of baking at home, check out Food52’s guide on bread baking.
Stay tuned as we dive into the step-by-step artisan bread recipe that will make your kitchen come alive with the smell of freshly baked bread.
Ingredients for Artisan Bread Recipe
Essential ingredients for a perfect loaf
When it comes to crafting a delightful artisan bread recipe, having high-quality ingredients is essential. You might think that bread is just flour and water, but each component plays a critical role in achieving that perfect crust and airy crumb. Here’s what you’ll need:
-
Bread Flour: This type of flour has a higher protein content than all-purpose flour, which helps develop gluten for that chewy texture we all love.
-
Water: Preferably filtered or bottled, as it enhances the flavor while keeping the yeast healthy and active.
-
Salt: A vital ingredient, salt not only enhances flavor but also strengthens the gluten structure.
-
Yeast: Whether you choose active dry yeast or instant yeast, both will fermente your dough beautifully, creating the rise.
-
Optional Add-ins: Think herbs, seeds, or cheese to elevate your loaf.
For more insights on the science behind baking, you can check out this article from King Arthur Baking. Improving upon these staple ingredients can vastly enhance your artisan bread recipe, so don’t skimp on quality. Creating a masterpiece starts here!
Step-by-Step Preparation of Artisan Bread
Baking artisan bread can feel like a magical experience, transforming simple ingredients into a crusty, golden loaf with a chewy interior. In this section, we’ll break down the process into simple, manageable steps, making your baking journey enjoyable and rewarding. Whether you’re a beginner or have some experience under your belt, this artisan bread recipe will guide you on how to create something truly special.
Combine the dry ingredients
To start your artisan bread recipe, gather these essential dry ingredients:
- 4 cups of bread flour
- 2 teaspoons of salt
- 1 teaspoon of sugar
- 1 teaspoon of instant yeast
In a large mixing bowl, whisk these ingredients together. The key here is to ensure even distribution of the salt and yeast. I love using bread flour in this recipe because it adds just the right amount of protein, giving your bread that nice texture. If you want to dive deeper into the science behind bread baking, you can check out King Arthur Baking for some fascinating insights.
Add water and mix
Now it’s time to bring your dry ingredients to life! Warm about 1 ½ cups of water (not too hot!) and slowly pour it into your flour mixture. Use a wooden spoon or your hands to mix it until all the flour is incorporated. Don’t worry about being perfectly smooth; a shaggy, sticky dough is exactly what you want at this stage. The warm water aids the yeast, activating it for that legendary rise.
Let the dough rise
Cover your bowl with a damp cloth or plastic wrap to lock in moisture and let the dough rise at room temperature for about 12-18 hours. Yes, you read that right! This long fermentation process allows for complex flavors to develop, giving your artisan bread the depth it deserves. After the first rise, your dough should have doubled in size and have a beautiful, bubbly surface.
Shape the loaf
Once your dough has risen, it’s time to shape it. Lightly flour a clean surface and gently turn the dough out of the bowl. Using your hands, stretch and fold the dough a few times to form it into a ball. This step isn’t about kneading; you just want to create surface tension. Let your dough rest for about 15 minutes, then shape it again into your desired loaf shape—either round or oval—placing it seam side down.
Prepare for baking
While your shaped loaf rests for another 1-2 hours, preheat your oven to 450°F (230°C). If you have a Dutch oven, now is the time to place it inside the oven to heat up as well. This method helps create a steamy environment for the bread to rise beautifully while baking. For the final touch, dust the top of your loaf with a bit of flour and score it with a sharp knife or razor blade. This allows the steam to escape and gives your bread that rustic look we all love.
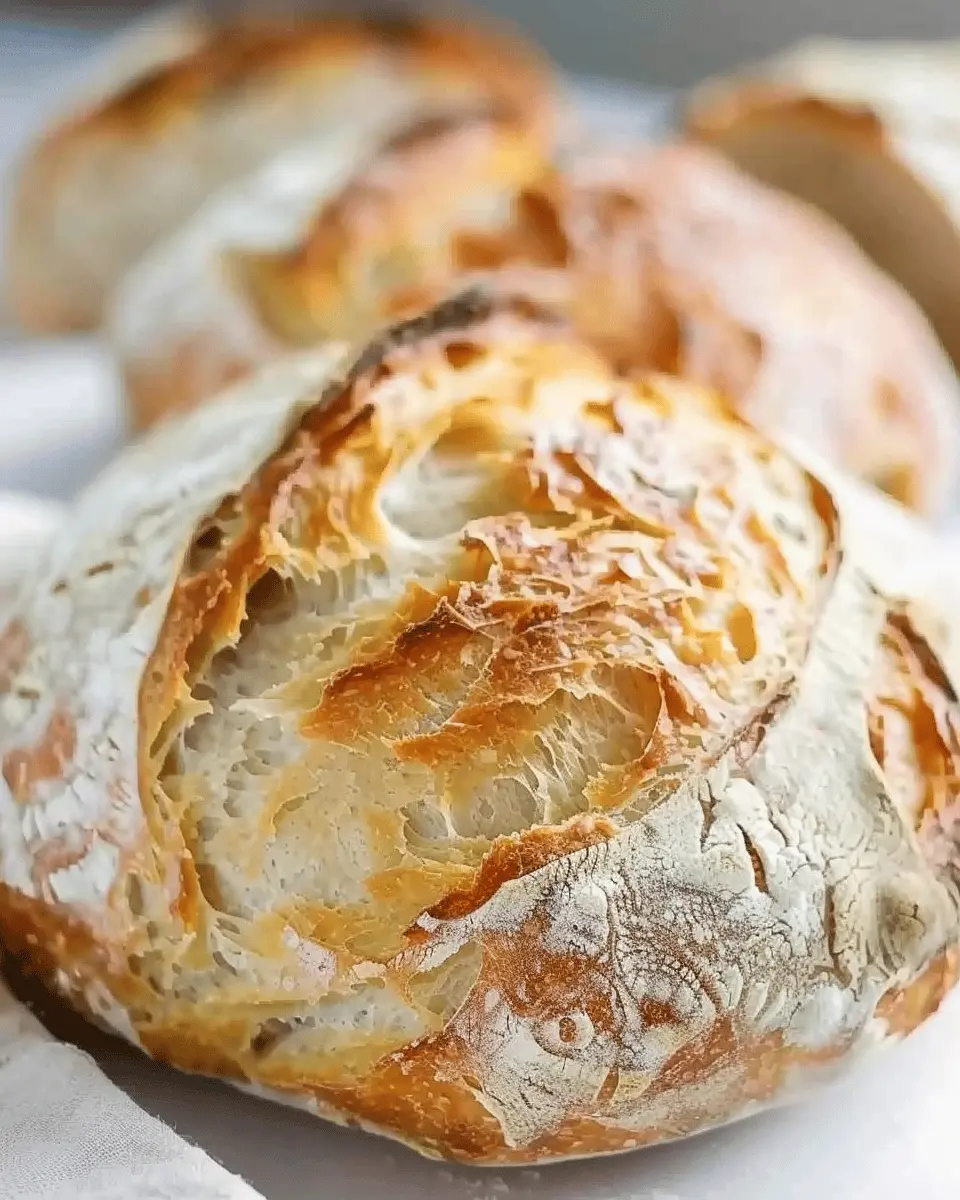
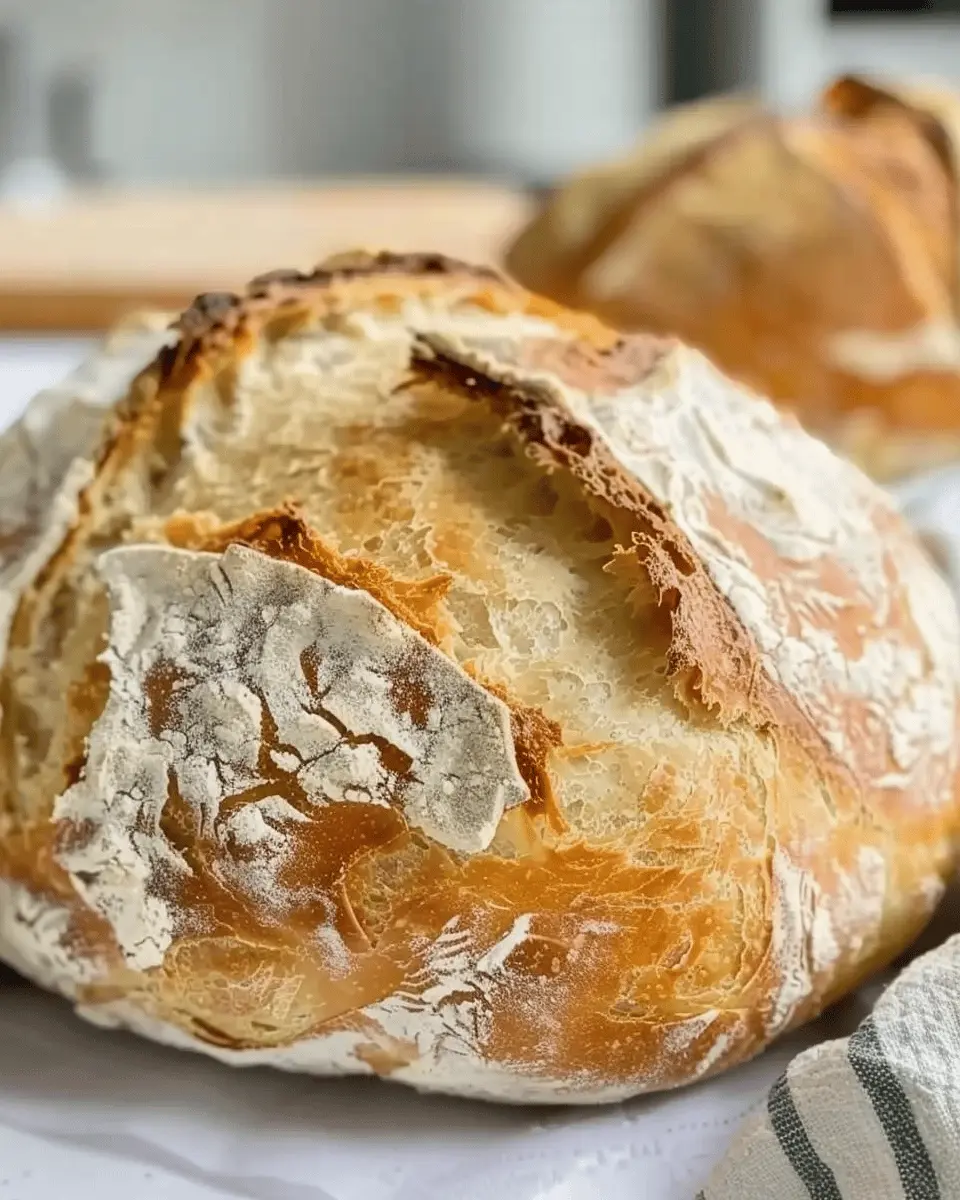
Bake to perfection
Carefully remove your preheated Dutch oven and place your loaf inside. Cover it with the lid and bake for about 30 minutes. Then, remove the lid and bake for an additional 15-20 minutes or until the crust is a rich golden brown. Your kitchen will smell heavenly! A key sign that your artisan bread is ready is the hollow sound it makes when you tap the bottom lightly.
Let the bread cool on a wire rack before slicing. This step is incredibly important—it allows the bread’s interior moisture to set, ensuring every slice has a delightful, chewy texture.
So, grab a nice piece with some olive oil or spread some butter on it, and enjoy the fruits of your labor! Making artisan bread is not just about the end product; it’s an experience that brings joy and satisfaction from start to finish. Happy baking!
Variations on Artisan Bread
When it comes to exploring the endless potential of your artisan bread recipe, the variations are both delightful and delicious. Let’s take a look at a few creative options that can elevate your baking game and impress your guests!
Herb-infused artisan bread
If you’re looking to elevate your bread with a burst of flavor, consider adding fresh herbs! Think rosemary, thyme, or basil, which not only enhance the taste but also make your kitchen smell amazing while baking. Simply chop your herbs finely and fold them into your dough during the mixing phase.
- Use about 2-3 tablespoons of chopped herbs for a subtle, aromatic touch.
- Pair it with a spreadable herb butter for a delightful appetizer or side.
Whole wheat artisan bread
Whole wheat bread is a fantastic way to make your artisan bread recipe healthier without sacrificing flavor. This version retains all the nutrients of the grain while offering a slightly nuttier taste that pairs beautifully with spreads and cheeses.
- Swap out half of the all-purpose flour for whole wheat flour in your original recipe.
- Consider adding a tablespoon of honey or molasses to balance the flavors.
Cheese and olive artisan bread
Imagine biting into warm, crusty bread filled with pockets of melted cheese and savory olives. This variation is perfect for gatherings or casual dinners! Choose your favorite cheese—feta, cheddar, or mozzarella work wonderfully—and mix it with pitted, chopped olives.
- Try combining 1 cup of cheese and ½ cup of olives for optimal flavor distribution.
- Serve it alongside a fresh salad or as part of a charcuterie board.
Whichever variation you choose, each bite will transport you to a world of flavor and creativity. Happy baking! For more tips and DIY ideas, check out this source or explore more recipes here.
Cooking Tips and Notes for Artisan Bread
Tips for a Crustier Loaf
Achieving that perfect crust on your artisan bread is all about technique. Here are some simple yet effective tips:
- Steam it Up: Create steam during the first few minutes of baking by placing a pan with water in the oven. This helps to create a crispier crust.
- High Heat: Start your oven on a high temperature (around 450°F) to kickstart the crust formation. Once you see the crust turning golden, you can lower the temperature to finish baking.
- Quality Flour: Use a high-protein flour for a chewy texture and better structure. Bread flour is your best friend here!
Notes on Storage
Once you’ve baked your delightful artisan bread, proper storage is key to maintaining freshness:
- Cool Completely: Always allow your bread to cool completely before slicing. This helps retain moisture and flavor.
- Bread Box or Cloth: Store your bread in a bread box or wrapped in a cloth rather than plastic, which can cause it to get soggy.
- Freezing for Longevity: If you want to keep it longer, slice and freeze your artisan bread. Just pop the slices in the toaster when you’re ready to enjoy them!
For more tips on perfecting your baking skills, check out resources like King Arthur Flour or The Great British Bake Off for inspiration!

Serving Suggestions for Artisan Bread
Artisan bread is not just a treat for your taste buds; it’s also a perfect companion for various dishes.
Pairing with Soups and Salads
What’s better than a warm slice of artisan bread paired with a steaming bowl of soup? The crusty texture of the bread complements smooth soups like tomato basil or hearty vegetable, allowing you to scoop every last drop. Consider serving it with a refreshing green salad bursting with colors and flavors. A light vinaigrette drizzled over mixed greens will create a delightful balance against the rich bread.
Ideal Toppings for Artisan Bread
When it comes to toppings, the sky’s the limit! Spread a thin layer of garlic butter or creamy herb cheese for a savory kick. For a heartier option, top your slice with Turkey Bacon, avocado, and a sprinkle of peppadew peppers. If you’re in a sweet mood, smear on some honey or fig jam, and let the flavors dance on your palate. These combinations are not only delicious but can also elevate your Artisan Bread Recipe from simple to extraordinary.
Looking for more creative ideas? Check out this guide for unique bread pairings and toppings that make every meal a celebration!
Time Breakdown for Artisan Bread
When you’re diving into an Artisan Bread Recipe, understanding the time involved can make your baking experience smoother and more enjoyable. Here’s how the timing breaks down:
Preparation Time
You’ll need about 15 minutes to mix and knead your dough. This stage is essential for developing the gluten that gives your bread that delightful chewy texture. While the initial step is quick, remember that good things take time!
Baking Time
After letting the dough rise, you’ll spend roughly 30 to 40 minutes baking your bread. During this time, the magic happens as the dough transforms into a beautiful crusty loaf with a warm, fragrant interior.
Total Time
In total, including resting and rising, you’re looking at about 5 to 6 hours. Yes, it seems like a long wait, but most of this is passive time as the dough does its thing. You could even take this opportunity to relax or prep your favorite spread (like a creamy herb cheese) or meal prep your sides, perhaps a fresh salad or some vegetable soup!
Baking artisan bread at home is not just about the ingredients—it’s about patience and passion. For more tips on making this recipe a breeze, check out these resources from expert bakers King Arthur Baking and The Kitchn.
Nutritional Facts for Artisan Bread
When diving into the delightful world of artisan bread, understanding its nutritional profile can help you appreciate each slice even more. Here’s a quick breakdown to help you make informed choices.
Calories
In a typical serving of artisan bread, you’re looking at around 120-150 calories. This makes it a suitable option for those wanting a flavorful addition without overloading on calories.
Protein
One of the best features of this artisan bread recipe is its protein content, which typically ranges from 4-6 grams per serving. This offers a nice boost, especially if you pair it with healthy toppings like avocado or, yes, even turkey bacon.
Sodium
While it varies based on the recipe, most artisan breads have about 200-300 mg of sodium per serving. This is relatively moderate, but always check the labels if you’re watching your sodium intake. For more details on bread and sodium, you can check resources like the American Heart Association.
Feel free to indulge in this warm, crusty delight while being mindful of your nutritional intake. After all, balance is key in enjoying good food!
FAQs about Artisan Bread
Can I make this bread without yeast?
Absolutely! If you’re looking for a delicious artisan bread recipe that doesn’t use yeast, consider experimenting with alternatives like sourdough starter or baking powder. Sourdough uses naturally occurring bacteria for fermentation, giving the bread a tangy flavor and chewy texture. For a quicker option, baking powder can be combined with a bit of vinegar to create a tasty, albeit denser, bread. Check out more about sourdough techniques on resources like The Kitchn.
How can I achieve a crispy crust?
Achieving that coveted crispy crust is about moisture and temperature. To create steam in your oven, a few tricks include:
- Preheat a baking stone or Dutch oven: This helps maintain an even temperature.
- Add water: Place a pan of water in the oven, or spritz the bread with water right before baking.
- Use high temperatures: Starting your baking at around 450°F helps create that golden, crunchy exterior.
A fun fact: many professional bakers recommend cooking the bread for the first 20 minutes covered and then uncovering it to let the crust crisp up.
What is the best way to store artisan bread?
To keep your artisan bread fresh, store it in a paper bag at room temperature for a couple of days. If you want it to last longer, slice the bread and wrap individual pieces in plastic wrap, then place them in an airtight container or freezer bag. This way, you can enjoy it later without losing the delightful texture! For detailed storage techniques, consult sources like King Arthur Baking.
With these tips, you’re well on your way to baking delicious, artisanal loaves right at home!
Conclusion on the Joy of Baking Artisan Bread
Baking artisan bread is not just about food; it’s an experience that engages all your senses. From the moment you knead the dough to the captivating aroma that fills your kitchen, each step invites you to slow down and enjoy the process. According to the Bread Bakers Guild of America, making bread can reduce stress and provide a sense of accomplishment—perfect for young professionals seeking balance in their busy lives.
The beauty of your Artisan Bread Recipe lies in its simplicity. With each loaf, you create not just a meal, but a warm invitation for connection with family and friends. So why wait? Embrace the joy of mixing, kneading, and baking—your taste buds will thank you! For more inspiration, check out King Arthur Baking for fascinating tips and tutorials on bread making.
Print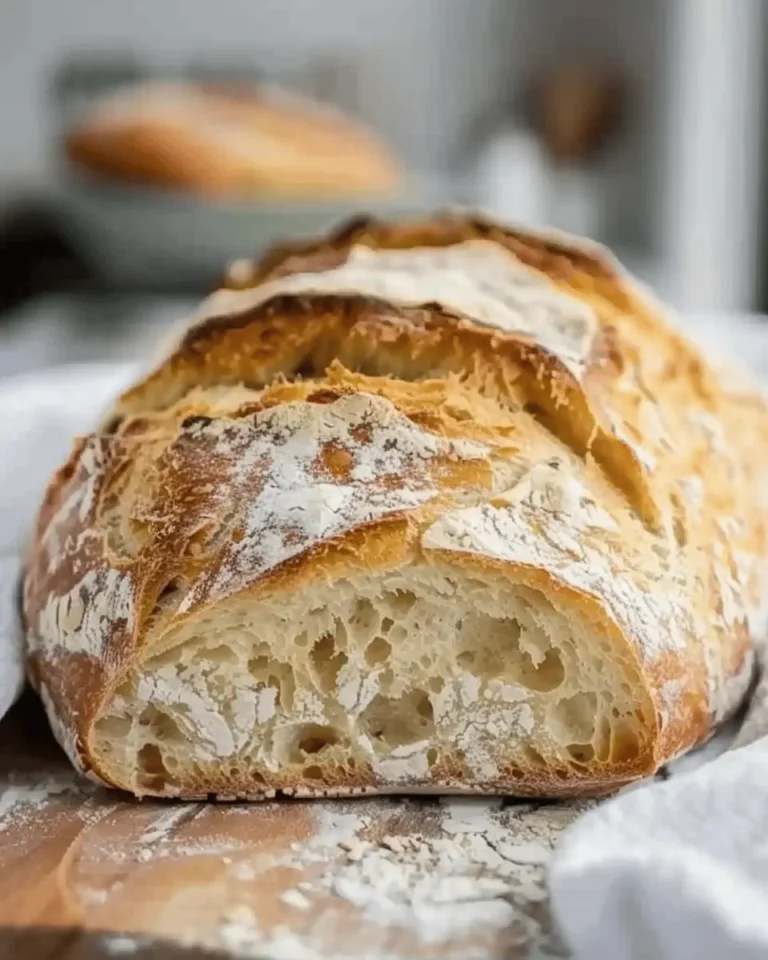
Artisan Bread Recipe: Easy Steps for Homemade Delight
This artisan bread recipe will guide you through easy steps to create homemade delight. Perfect for any occasion!
- Total Time: 18 hours
- Yield: 1 loaf 1x
Ingredients
- 4 cups all-purpose flour
- 1 tablespoon salt
- 1/4 teaspoon instant yeast
- 1 3/4 cups warm water
Instructions
- In a large bowl, combine flour, salt, and yeast.
- Add warm water and stir until well mixed.
- Cover the bowl with a clean cloth and let the dough rise for 12-18 hours.
- Once risen, transfer the dough to a floured surface and shape it into a ball.
- Let it rest for another 1-2 hours.
- Preheat oven to 450°F (230°C) and place a Dutch oven inside to heat.
- Carefully place the dough in the Dutch oven, cover, and bake for 30 minutes.
- Remove cover and bake for an additional 15 minutes until golden brown.
Notes
- For best results, use high-quality flour.
- Experiment with adding herbs for flavor variations.
- Prep Time: 15 minutes
- Cook Time: 45 minutes
- Category: Breads
- Method: Baking
- Cuisine: American
- Diet: Vegetarian
Nutrition
- Serving Size: 1 slice
- Calories: 120
- Sugar: 0g
- Sodium: 400mg
- Fat: 1g
- Saturated Fat: 0g
- Unsaturated Fat: 0g
- Trans Fat: 0g
- Carbohydrates: 25g
- Fiber: 1g
- Protein: 4g
- Cholesterol: 0mg
Keywords: Artisan Bread Recipe, Homemade Bread, Easy Bread Recipe